WebCommander
The WebCommander is a web page hosted by TIAGo. It can be accessed from any modern web browser that is able to connect to TIAGo (even from a mobile phone). It is an entry point for several monitoring and configuration tasks that require a Graphical User Interface (GUI).
Accessing the WebCommander
- Ensure that the device you want to use to access the website is in the same network and able to connect to TIAGo.
- Open a web browser and type in the address bar the host name or IP address of TIAGo’s control computer and try to access port 8080:
http://tiago-115c:8080 - If you are connected directly to TIAGo, when the robot is acting as an access point, you can also use:
http://control:8080
The pages in the WebCommander are quite self-explanatory. Especially the Diagnostics and Logs tabs are useful for debugging.
Networking
In the webcommander, it is also possible to configure TIAGo's networking. There are two ways of connecting TIAGo to a network or PC: wifi and Ethernet.
WARNING: Before changing internet connections, make sure you always have a way to connect to TIAGo. Messing up the settings here might result in not being able to connect to TIAGo and change the settings back. I don't know this for sure but let's not find out.
wifi
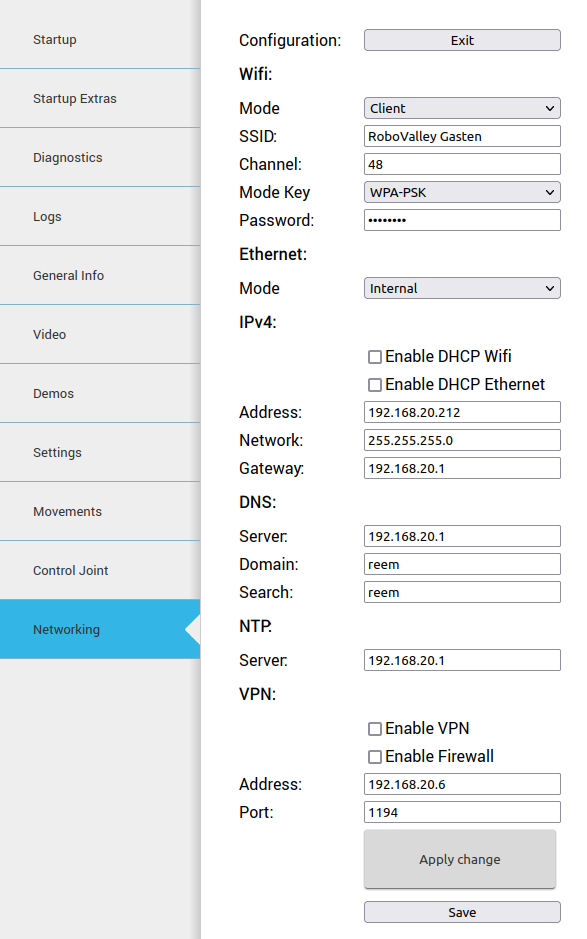
wifi can be used as client or access point. As Access Point, TIAGo creates its own network that you can connect to from a laptop. Simply set the wifi mode to Access Point, set an SSID (name) for the network to be created, set the channel to 1, and set a password.
TIAGo can also be connected to an existing network by setting the wifi mode to client, setting the SSID to the name of the existing network, set the channel to one of the wifi channels (use sudo iwlist wlan0 scan | grep Frequency | sort | uniq -c | sort -n to find the channel, changing wlan0 to your interface name which can be found using ifconfig). Also set the password.
Additionally, you need to fill in some IPV4, DNS and NTP addresses. Primarily, check the gateway of the network (often starting with 192.168...). In the case of RoboValley Gasten it is 192.168.20.1, so change the address everywhere to 192.168.20.XX (you can leave the XX as-is).
Press Apply change, and TIAGo should now be connected to the network!
NOTE: The robovalley network does not allow for pinging between pc's. So the only way I found to get this working is by connecting to TIAGo through ssh while the wifi is in acces point mode, as well as being connected through ethernet, then changing the wifi to client as described above, and then you should still have the ssh open while being connected to internet.
This method can also be used to connect tiago to a 5G network, allowing for faster data transfer if needed.
See Figure below for a setup that worked for me.

Ethernet
Ethernet can be used to connect to a PC (Internal mode) or to an existing network (external mode). However, the ethernet ports at the lab require a TU Delft log-in through a browser.